
Crochet Moss Stitch: Easy Step-by-Step Tutorial for Beginners
There's something especially satisfying about a crochet stitch that looks intricate but doesn't require complicated techniques.

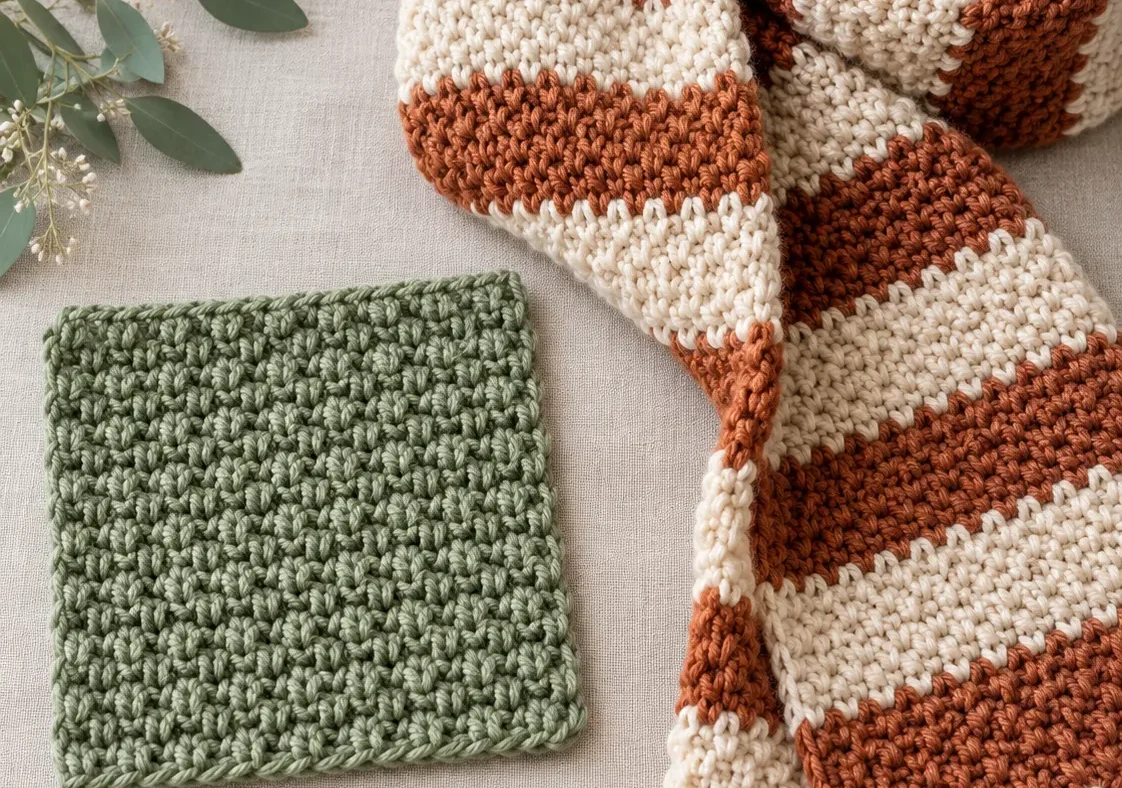
There’s something especially satisfying about a crochet stitch that looks intricate but doesn’t require complicated techniques. Crochet moss stitch creates a beautifully textured, woven-looking fabric using just single crochet stitches and chains. In this tutorial, you’ll learn how to make it from the foundation chain to the final row, understand exactly where your hook belongs, and avoid the mistakes that can leave your edges uneven.
Whether you’re planning a cozy fall scarf, a modern striped blanket, a soft washcloth, or a pair of crochet fingerless gloves, this is a stitch worth having in your collection. The best part? Once you understand the first two rows, you’ll repeat the same simple sequence throughout your project.
In this guide, you’ll learn:
- What crochet moss stitch is and why it’s also called linen stitch
- Which yarn and hook work best for beginners
- How to crochet moss stitch, one row at a time
- How to read the stitch repeat and a simple crochet chart
- How to keep both edges straight
- How to change yarn colors for striped moss stitch
- How to adjust the pattern for different project widths
- How to fix common mistakes before they affect your project
What Is Crochet Moss Stitch?
Crochet moss stitch is a simple crochet technique that combines single crochet stitches with chain-one spaces.
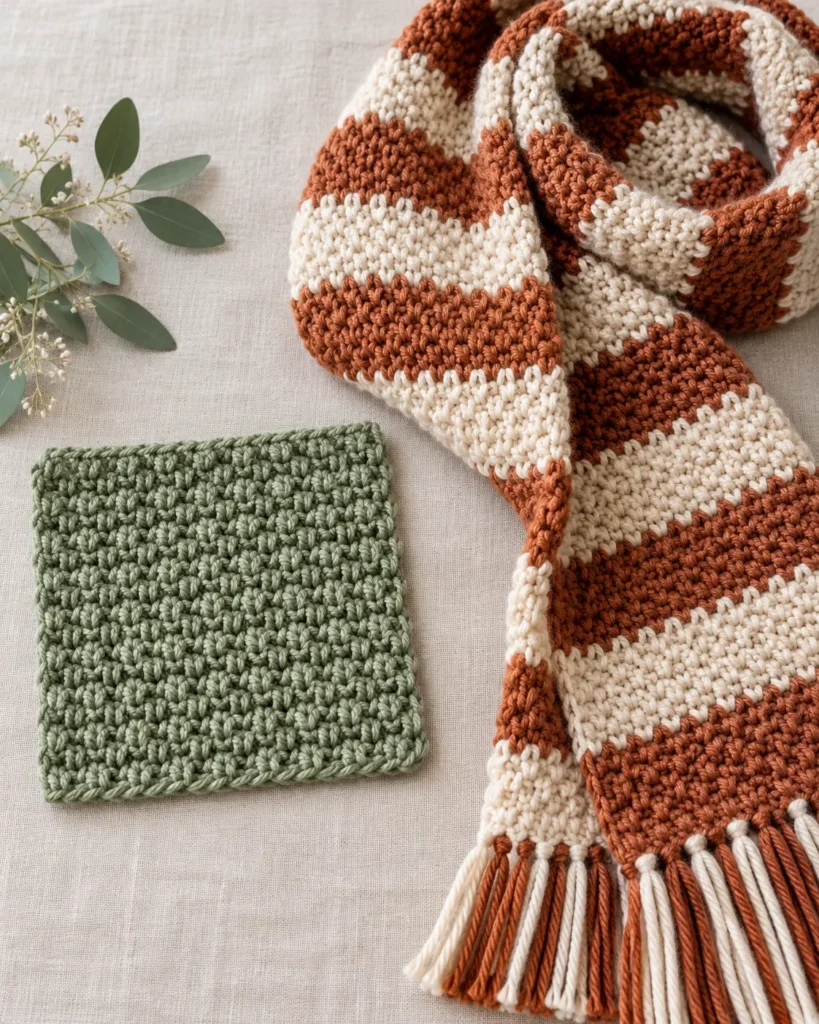
Instead of placing every new stitch directly into the top of a stitch from the previous row, you work single crochet stitches into the open chain spaces. This creates a subtle, staggered texture that resembles woven fabric.
It’s one of those stitches that looks lovely in almost any yarn color. With solid yarn, the texture becomes the main feature. With two or more colors, the fabric takes on a completely different personality.
The overall appearance is neat, balanced, and versatile.
Is Moss Stitch the Same as Linen Stitch?
Yes, in many crochet patterns, moss stitch is also called linen stitch or granite stitch.
These names commonly describe the same basic single crochet and chain-one combination. However, you may notice that different tutorials begin their rows differently. Some use a chain-two turning method, while others use a chain-one turn with separate edge stitches.
Both can produce moss stitch fabric. For this guide, we’ll use a chain-one turning method with a single crochet at each edge. This gives us a consistent structure that’s easy to check as we work.
Follow the foundation and turning instructions from the same pattern. Mixing methods from different tutorials can cause uneven edges or incorrect stitch counts.
Why You’ll Love This Stitch
Moss stitch is an excellent choice when you want texture without the complexity of advanced crochet stitches.
1. It Uses Basic Crochet Skills
If you can make a chain and a single crochet, you already know the essential techniques. The only new habit is learning to find the chain-one spaces.
2. It Creates a Beautiful Texture
The small, staggered stitches produce a woven appearance that works especially well with smooth yarn. It’s textured enough to be interesting but doesn’t rely on tall, bulky stitches.
3. It Looks Attractive on Both Sides
Moss stitch is a good option for reversible-looking projects such as scarves and blankets. Both surfaces display an appealing texture, so you don’t have to hide one side.
4. It Works Beautifully With Color
You can use one color for a calm, minimalist look or introduce stripes for something more playful. Autumn combinations such as rust and cream, sage and oatmeal, or burgundy and blush are especially pretty for seasonal projects.
5. It’s Easy to Memorize
Once the setup row is finished, the repeating row becomes familiar. That makes moss stitch suitable for projects you want to enjoy at a relaxed pace.
You don’t need a large collection of crochet tools for this tutorial. A small amount of suitable yarn and one crochet hook are enough to get started.
| Material | Recommendation |
|---|---|
| Yarn | Smooth worsted-weight yarn (category 4) |
| Crochet hook | 5.0 mm / US H-8 as a starting point |
| Scissors | Small craft scissors |
| Tapestry needle | For weaving in yarn ends |
| Stitch markers | Two removable markers |
| Measuring tape | For checking gauge and finished size |
For your first moss stitch sample, I recommend choosing a smooth, light or medium-colored yarn. Think cream, dusty pink, light sage, or soft lavender. These colors make the stitch structure easier to see.
Dark yarn can hide the chain spaces, particularly when you’re still learning where to insert your hook. Fuzzy yarn can make the process even trickier. There’s nothing wrong with using those yarns later, but smooth yarn makes the first attempt easier.
Check the recommended hook size on your yarn label. A 5.0 mm hook is a practical starting point for many worsted-weight yarns. If your stitches feel excessively tight, try moving up half a millimeter.
If the fabric looks too loose for the project you have in mind, try a smaller hook. The aim is a comfortable, even fabric rather than the tightest possible stitches.
Crochet Moss Stitch Abbreviations
This pattern uses US crochet terminology.
| Abbreviation | Meaning |
|---|---|
| ch | Chain |
| sc | Single crochet |
| sk | Skip |
| st | Stitch |
| sts | Stitches |
| sp | Space |
| ch-1 sp | Chain-one space |
| rep | Repeat |
UK crocheters: The US single crochet is called a double crochet in UK terminology.
Before beginning, make sure you’re comfortable with the basic single crochet stitch. A single crochet is made by inserting your hook into the designated stitch or space, pulling up a loop, yarning over, and pulling through both loops on the hook.
How to Crochet Moss Stitch Step by Step
Let’s begin with a practice sample.
We’ll start with 21 foundation chains and work a simple repeat that maintains a stable stitch count. For this specific version, the starting chain must be an odd number. The pattern below has been checked for internal stitch-count consistency.
Step 1: Make the Foundation Chain
Create a slip knot and place it on your crochet hook.
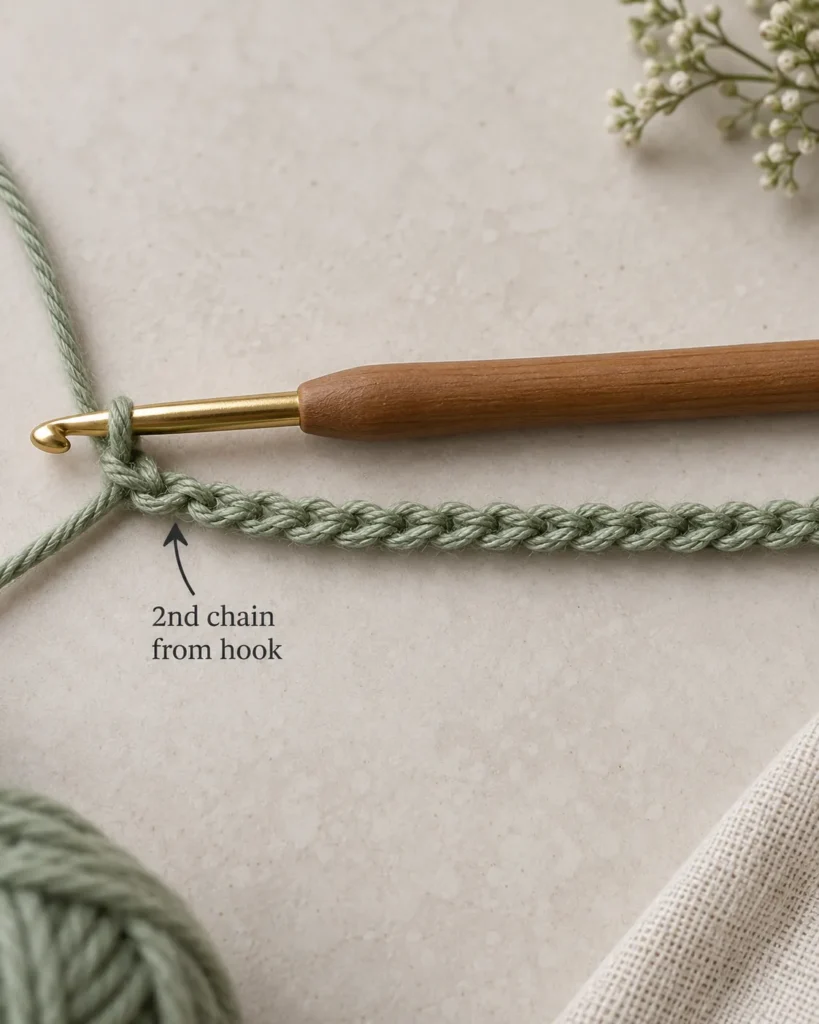
Chain 21.
Try to keep each chain approximately the same size. Don’t pull the loops too tightly against the hook. A tight foundation chain can make the first row difficult to work.
Before continuing, count all 21 chains. You now have the foundation for your first moss stitch sample.
Step 2: Work the First Single Crochet
Insert your hook into the second chain from the hook.
Yarn over and pull up a loop.
You should have two loops on your hook.
Yarn over again and pull through both loops.
You’ve completed your first single crochet. This stitch forms the beginning of Row 1.
Step 3: Create Your First Chain Space
Chain one.
Skip the next foundation chain. Insert your hook into the following chain and make one single crochet. You’ve now worked the basic combination that gives moss stitch its texture.
The chain-one creates a small opening between the single crochet stitches. That opening will become important when you work the following row.
Step 4: Repeat Across the Foundation
Continue repeating:
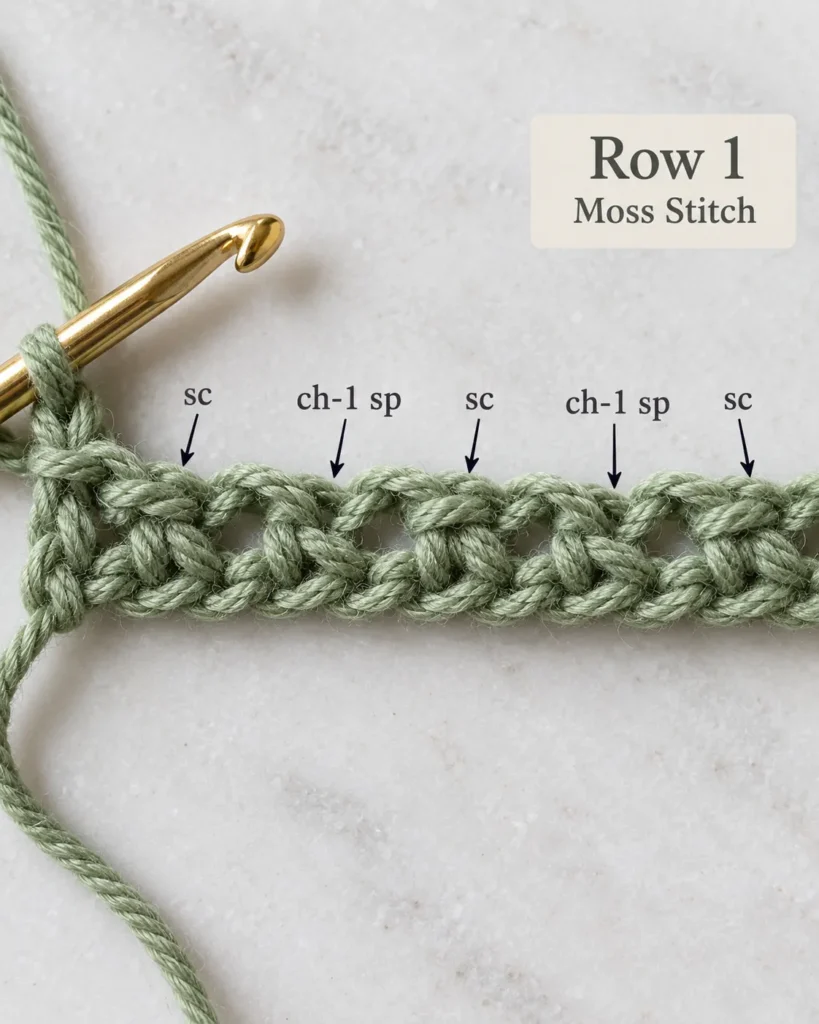
Chain 1, skip 1 chain, single crochet in the next chain.
Stop when one foundation chain remains unworked. Work a single crochet into that final chain. Your first row is complete.
You should have:
- 11 single crochet stitches
- 9 chain-one spaces
The last two single crochets sit next to each other at the end of the row. That’s intentional in this version of the pattern. Take a moment to count before moving on.
Step 5: Find the Chain-One Spaces
Turn your work.
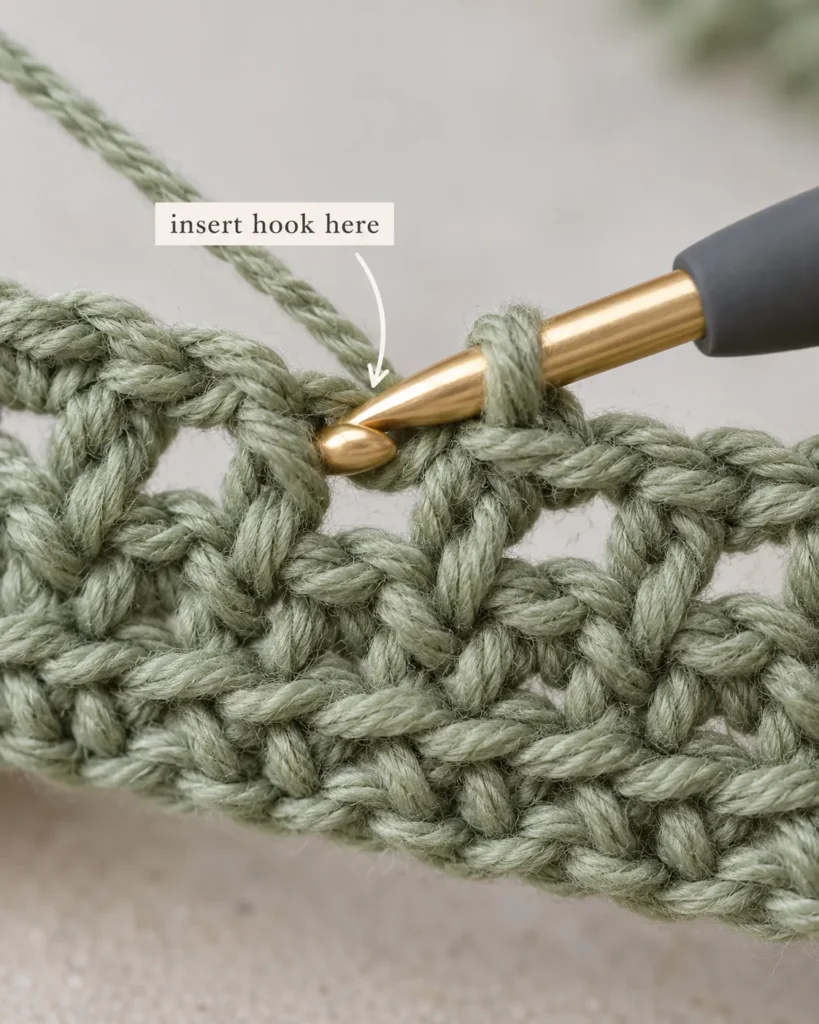
Before starting the next row, look closely at the gaps between the stitches. You’ll notice openings created by the chain-one stitches. These openings are called chain-one spaces.
To work into a chain-one space, insert your hook through the opening beneath the chain. Don’t try to force the hook through the tiny top loops of the chain itself. The ability to recognize these spaces is the key to making moss stitch comfortably.
Step 6: Crochet Row 2
Chain one to turn.
This turning chain does not count as a stitch. Work one single crochet into the first edge single crochet.
Chain one.
Skip the next single crochet and work one single crochet into the first chain-one space.
Now repeat:
Chain 1, skip the next single crochet, and single crochet into the next chain-one space.
Continue until you’ve worked into all nine chain-one spaces. Then work one final single crochet into the remaining edge single crochet.
Row 2 is complete.
Your stitch count remains:
- 11 single crochets
- 9 chain-one spaces
Step 7: Repeat the Pattern
From this point onward, repeat Row 2.
Here’s the rhythm:
- Chain one and turn.
- Single crochet into the first edge stitch.
- Chain one.
- Skip the next single crochet.
- Single crochet into the next chain-one space.
- Repeat across the chain spaces.
- Finish with a single crochet in the final edge stitch.
The texture becomes more recognizable after several rows. If the first two rows look slightly unusual, don’t worry. The woven effect develops as the fabric grows. Keep checking your edges and stitch count until the repeat feels familiar.
Step 8: Fasten Off
When your sample reaches the desired height, cut the yarn, leaving a tail for weaving in. Pull the tail through the final loop.
Tighten gently.
Thread the tail onto a tapestry needle and weave it through several stitches on the back of the fabric. Change direction while weaving to help secure the end. Avoid pulling the tail so tightly that it distorts the edge. Your moss stitch sample is finished!
Crochet Moss Stitch Pattern and Diagram
If you prefer to keep written instructions nearby while crocheting, this is the compact version of the pattern.
Step 1 — Free Moss Stitch Written Pattern
Foundation: Odd number of chains
Practice foundation: 21 chains
Turning chain: Ch 1, does not count as a stitch
Foundation: Ch 21.
Row 1: Sc in 2nd ch from hook. Ch 1, sk next ch, sc in next ch. Repeat from until one foundation ch remains. Sc in last ch. Turn.
Row 2: Ch 1, sc in first sc. Ch 1, sk next sc, sc in next ch-1 sp. Repeat from across all ch-1 spaces. Sc in final edge sc. Turn.
Rows 3 onward: Repeat Row 2 until your fabric reaches the desired length.
Fasten off: Cut yarn, secure the final loop, and weave in the ends.
Step 2 — Understanding the Stitch Structure
A simple way to visualize the stitch is to think of the chain spaces as small windows. Each new row places its main single crochets inside those windows. The pattern shifts slightly with every row, which creates the characteristic woven texture.
Step 3 — Beginner-Friendly Text Diagram
This is a simplified stitch-position guide, not a standard international crochet symbol chart.
Legend:
X= Single crocheto= Chain-one space|= Outer edge of the fabric
ROW 4 | X o X o X o X o X o X o X o X o X o X X | ROW 3 | X o X o X o X o X o X o X o X o X o X X | ROW 2 | X o X o X o X o X o X o X o X o X o X X | ROW 1 | X o X o X o X o X o X o X o X o X o X X |
FOUNDATION: 21 CHAINS
The rows are written in their working direction for readability. When turned and viewed as fabric, the single crochets sit over the chain spaces from the row below. The full repeat is easier to understand from actual close-up photography, so use the diagram together with the written instructions.
Step 4 — Quick Stitch Count Reference
| Row | Single crochet | Chain-one spaces |
|---|---|---|
| Row 1 | 11 | 9 |
| Row 2 | 11 | 9 |
| Row 3 | 11 | 9 |
| Row 4 | 11 | 9 |
| Every following row | 11 | 9 |
The consistent stitch count is useful for catching mistakes before they affect the shape of your work.
How to Keep Straight Edges
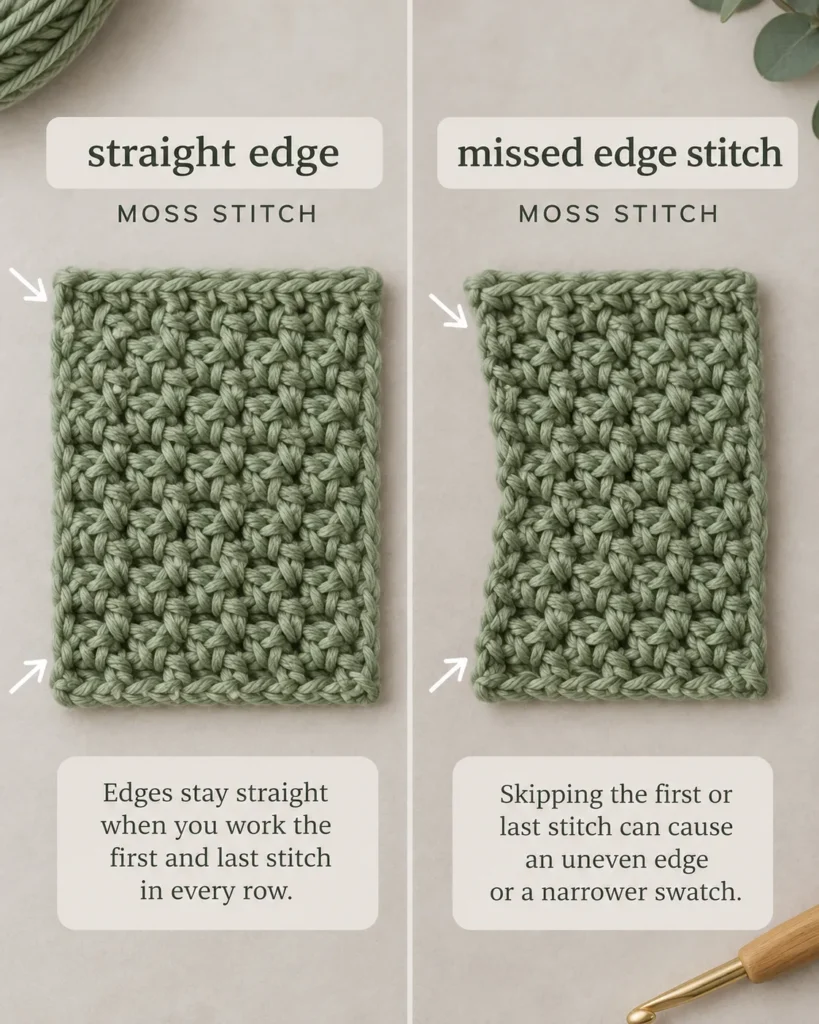
One of the most common problems with crochet moss stitch is an edge that slowly becomes wider or narrower. Fortunately, there are a few simple ways to prevent it.
Step 5 — Use Stitch Markers
Place a removable stitch marker in the first and last edge single crochet. Move the markers up as you complete each row. This makes the edge stitches easier to find, particularly while you’re still learning.
Step 6 — Don’t Forget the Last Stitch
The final edge stitch can be difficult to see when you turn your work. Before finishing a row, check that you’ve worked into every chain-one space and the last edge stitch. If you leave out the final single crochet, the fabric may begin to narrow.
Step 7 — Watch Your Turning Chain
Keep the turning chain relaxed. A tight chain can pull the edge inward. An oversized chain can make it look bumpy. Aim for the same comfortable tension you use throughout the rest of the row.
Step 8 — Check Your Stitch Count
For the 21-chain practice sample, you should always have 11 single crochets and 9 chain-one spaces. If your count changes, identify the problem before crocheting more rows. It’s easier to undo one row than to discover the mistake after an entire scarf has been completed.
Easy Moss Stitch Practice Square
The best way to become comfortable with a new stitch is to finish a small project before starting something larger.
This practice square uses the same pattern you’ve just learned. It’s simple enough for beginners and makes a useful reference for future projects.
Practice Square Pattern
Materials:
- Worsted-weight yarn
- 5.0 mm crochet hook, or an appropriate size for the yarn
- Scissors
- Tapestry needle
Instructions:
- Chain 21.
- Crochet Row 1 using the written pattern above.
- Repeat Row 2 until the height is approximately equal to the width.
- Lay your work flat and measure both directions.
- Add or remove rows if needed.
- Fasten off and weave in the ends.
The final dimensions will depend on your yarn, hook, and personal tension.
What Should Your Square Look Like?
A correctly worked moss stitch square should have an even pattern of small textured stitches. The rows should maintain a consistent width. Both edges should look reasonably straight when the piece is resting flat.
If your square is slightly uneven, examine the stitch count and tension before assuming you need to start over. Small tension differences often become less noticeable as your crochet technique improves.
Three Ways to Use Your Practice Square
Make a coaster: Choose an appropriate cotton yarn and create a small finished square.
Keep a stitch sample: Label it with the yarn, hook size, and gauge so you can refer to it later.
Start a sampler blanket: Make several matching squares using different yarn colors and join them into a larger project.
How to Change Colors in Moss Stitch
Striped moss stitch is a lovely way to add personality to an otherwise simple project.
The alternating stitches create small, broken areas of color rather than long solid columns. This makes even basic stripes look interesting.
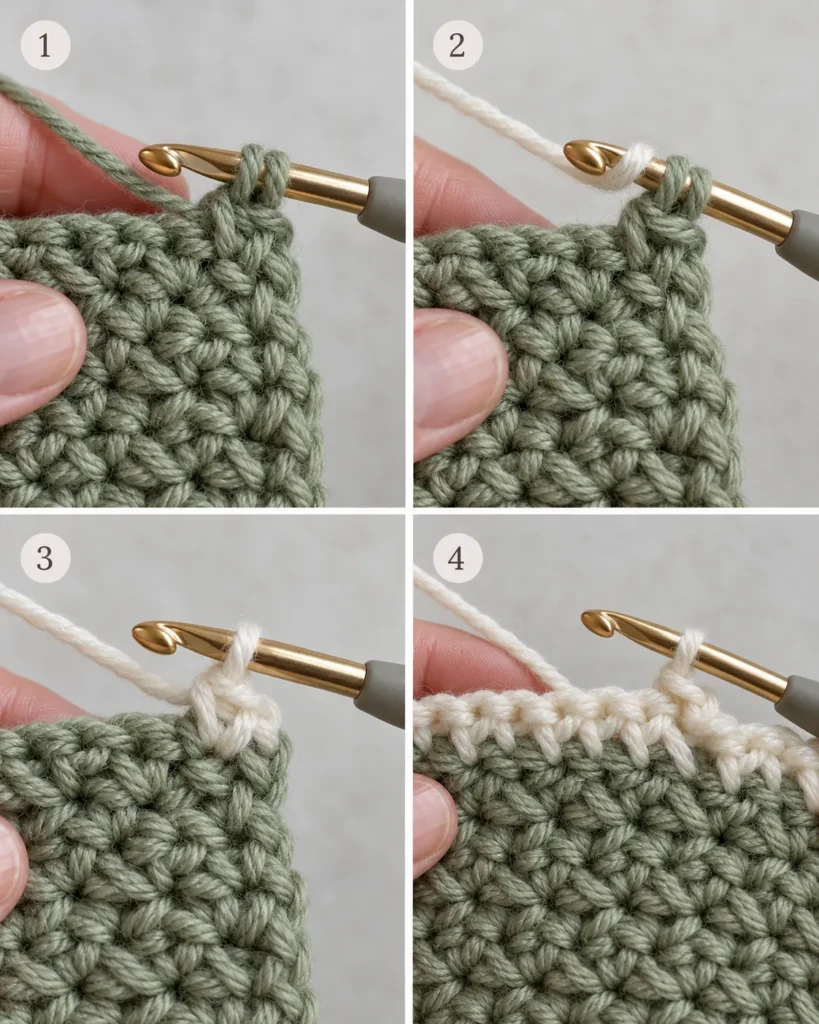
Step 9 — Changing Color at the End of a Row
For a clean row-to-row transition, change colors while completing the final single crochet.
- Work to the final single crochet of the row.
- Insert your hook into the final stitch.
- Yarn over with the old color and pull up a loop.
- Drop the old working yarn.
- Yarn over with the new color.
- Pull the new color through the two loops.
- Turn and continue crocheting with the new yarn.
This allows the new color to begin neatly at the row boundary.
Step 10 — Choosing Your Stripe Width
Try experimenting with:
- Two-row stripes for frequent color changes
- Four-row stripes for balanced color sections
- Six-row stripes for wider, calmer blocks
You can also alternate two different stripe widths. For example, a series of narrow cream stripes between wider sage-green sections creates a soft, modern look.
Step 11 — Fall Color Combinations to Try
October is a wonderful time to explore warm, cozy crochet palettes.
Consider these combinations:
Autumn Meadow: Sage green, cream, and muted rust.
Pumpkin Spice: Warm terracotta, oatmeal, and cinnamon brown.
Soft Harvest: Dusty rose, beige, and olive green.
Woodland Neutrals: Mushroom gray, warm ivory, and chocolate brown.
If you’re unsure which colors work together, place the yarn skeins side by side in natural daylight. For an understated result, combine one stronger color with two softer neutrals.
Best Yarn for Moss Stitch
The yarn you choose can change the appearance and feel of moss stitch considerably. Here are three useful starting options.
Cotton Yarn
Cotton creates clearly defined stitches and is a practical choice for dishcloths, washcloths, and decorative pieces. It can feel firmer than some other fibers, depending on the yarn. For a project that needs to drape, always make a swatch first.
Acrylic Yarn
Acrylic is widely available in many weights and colors. It’s suitable for a range of blankets, scarves, and everyday accessories. Choose a smooth yarn if you want the moss stitch texture to remain visible. Always follow the care instructions for your particular yarn.
Wool and Wool Blends
Wool and wool blends can create soft, warm accessories. They may also offer elasticity that is useful for wearable items. Because wool yarns vary, test the fabric before choosing one for a fitted project.
Which Yarn Is Best for Beginners?
A smooth worsted-weight yarn in a medium-light color is a sensible place to start. Once you’re confident with the repeat, try other fibers and yarn weights. You’ll discover that small changes in yarn and hook size can produce noticeably different fabric.
Beautiful Moss Stitch Project Ideas
Once you’ve mastered the basic pattern, you can use it in plenty of crochet projects. The stitch is particularly good for rectangles and squares, although shaped projects are possible with additional pattern instructions.
1. Crochet Moss Stitch Blanket
A moss stitch blanket combines a simple repeating pattern with a textured surface. It’s an attractive option for modern, minimalist crochet projects. You can use one calming color or introduce stripes.
For larger blankets, work a gauge swatch before calculating the foundation chain. A simple border can give the finished blanket a polished look.
2. Striped Moss Stitch Scarf
Scarves are a natural next step after completing a practice square. Choose your preferred width, then continue repeating the rows until the scarf reaches the length you want. A two-color version can be especially attractive. For a scarf with softer movement, choose a yarn and hook combination that produces comfortable drape.
3. Moss Stitch Baby Blanket
Moss stitch produces a relatively flat fabric that can work beautifully in baby blanket designs. Choose a soft, washable yarn suitable for the project. Keep the construction simple and avoid loose decorative attachments. For infant safety, loose blankets should not be placed in a baby’s sleep area.
4. Crochet Fingerless Gloves
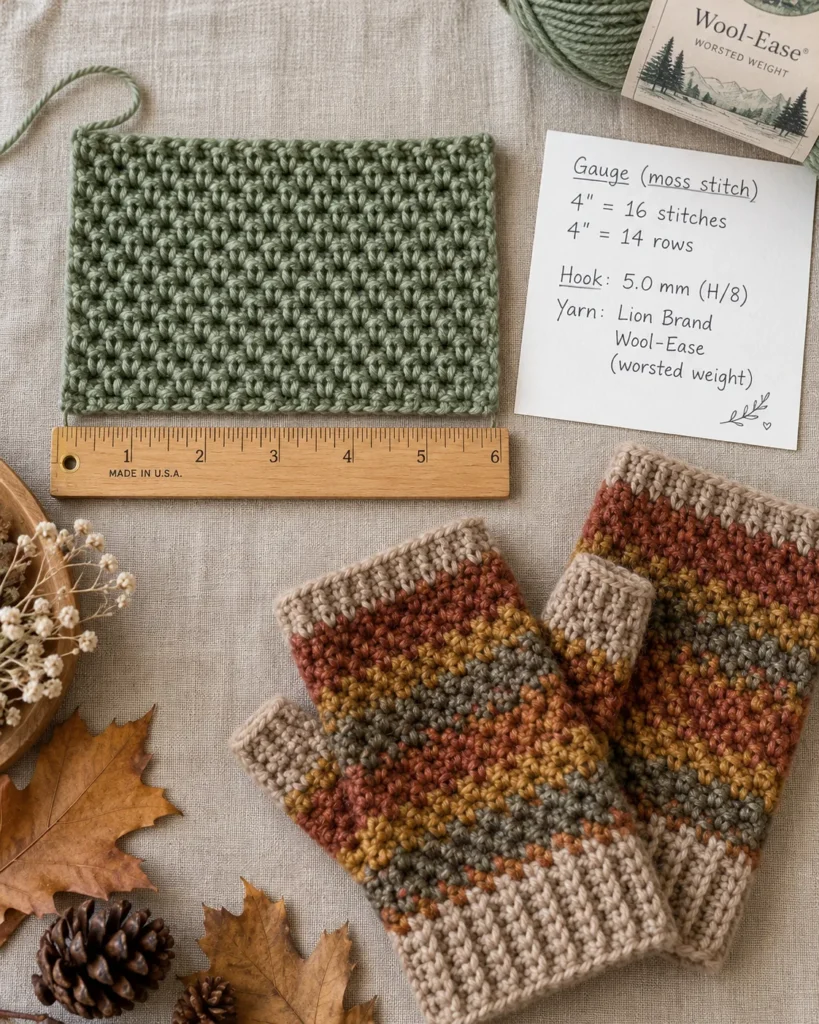
Moss stitch can create a beautiful textured surface for fingerless gloves. However, gloves require more attention to fit than a scarf or blanket. You’ll need to consider wrist circumference, hand width, thumb placement, and how much the fabric stretches.
A glove design may use a flat panel joined with a thumb opening or a more advanced pattern worked in rounds. For the most comfortable result, test the fabric around your hand before completing the pair. A separate, size-tested crochet fingerless gloves pattern is best for beginners who want accurate shaping instructions.
5. Crochet Washcloths
Moss stitch washcloths are simple and useful. Choose cotton yarn appropriate for frequent washing. A single-color square makes a lovely everyday item, while a striped version can be a thoughtful handmade gift.
6. Textured Pillow Covers
Moss stitch can add subtle texture to handmade cushion covers. Measure your cushion insert first. Then crochet panels that match the dimensions and construction method you plan to use. A simple envelope-style backing or joined two-panel cover can create a neat result.
Gauge, Sizing, and Yarn Planning
If you’re making a small practice swatch, exact gauge isn’t essential. But when you move on to blankets, scarves, or wearable accessories, gauge becomes much more important.
What Is Crochet Gauge?
Gauge describes how many stitches and rows fit within a measured area of fabric.
Two crocheters using the same yarn and hook may produce different gauge measurements because their tension differs. That’s why it’s better to measure your own work instead of assuming the dimensions will match someone else’s.
How to Measure Moss Stitch Gauge
- Crochet a swatch larger than the area you intend to measure.
- Let the fabric relax.
- Wash and block it if that’s how you’ll treat the finished project.
- Lay it flat without stretching.
- Measure across the center of the fabric.
- Count stitch positions and rows in a consistent area.
- Record the measurements.
For this stitch, a horizontal stitch position may be occupied by a single crochet or a chain-one space. Be consistent when counting.
How to Calculate Your Starting Chain
For the specific pattern used in this tutorial, a foundation of 21 chains gives 20 worked stitch positions across Row 1. To adjust the size, use an odd number of foundation chains. Suppose you measure a gauge of four stitch positions per inch.
For a piece 10 inches wide:
4 × 10 = 40 stitch positions. Using our foundation method, add one chain.
That gives a foundation of 41 chains. This is only an example. Your actual gauge must come from your own swatch.
How Much Yarn Will I Need?
Yarn requirements depend on the finished size, fiber, hook size, and stitch tension.
For a better estimate, make a swatch using your chosen supplies. Measure its finished area and the amount of yarn used. Then compare the swatch area with the project area. Allow extra yarn for borders, finishing, and adjustments.
Common Mistakes and Troubleshooting
Even a straightforward stitch can be frustrating when the result doesn’t look right. Use this quick guide to identify what might be happening.
| Problem | Possible cause | Easy fix |
|---|---|---|
| Fabric gets narrower | Missed edge stitch or chain space | Count the row and use stitch markers |
| Fabric gets wider | Extra chain or stitch | Compare with previous row |
| Edges are uneven | Inconsistent turning technique | Follow one turning method |
| Fabric feels stiff | Tight tension or small hook | Try a larger hook |
| Holes look too large | Loose chains or large hook | Check tension and hook size |
| Foundation curls | Tight starting chain | Work a looser foundation |
| Color changes look messy | Inconsistent change location | Change during the final stitch of the row |
Why Is My Moss Stitch Getting Smaller?
The most likely cause is a missing stitch or chain-one space.
Start by counting.
For our practice sample, each row should contain 11 single crochets and 9 chain-one spaces. If the stitch count is correct but the fabric appears narrower, compare your tension with earlier rows.
Why Does My Moss Stitch Look Too Loose?
Check the size of your chain-one stitches. If they’re significantly larger than your single crochets, the spaces may look exaggerated. A smaller hook can sometimes help, but avoid tightening the yarn excessively. Try a few rows with more consistent tension before changing your supplies.
Why Are My Edges Bumpy?
Check that you’re working the final edge stitch in the correct place. Also make sure you’re not adding an extra chain after the last single crochet. Keep the turning chain consistent.
Should I Undo a Row With a Mistake?
It depends on the mistake. If the error changes the stitch count and affects the width, correcting it early is usually worthwhile.
If it’s a small cosmetic irregularity that doesn’t affect the structure, you may decide to leave it. For your first practice square, correcting mistakes is useful because it helps you understand the stitch.
Crochet Moss Stitch Tips for Better Results
A few small habits can make your projects look neater. Choose visible yarn. A smooth, light-colored yarn makes learning much easier.
Count your first rows. Don’t rely on memory until the pattern feels familiar.
Mark both edges. Stitch markers help prevent missed edge stitches. Keep tension comfortable. Pulling the yarn too tightly can distort the stitch.
Make a swatch before a large project. A small sample tells you how the fabric will look and feel.
Record your hook size. If you return to a project later, you’ll know which tools you used. Check the fabric periodically. Lay it flat to catch changes in width before they become difficult to correct.
Take breaks. Relax your hands and shoulders during longer crochet sessions. The goal isn’t perfect speed. It’s consistent, comfortable stitching.
Frequently asked questions
Is Crochet Moss Stitch Good for Beginners?
Yes. Moss stitch uses basic single crochet and chain stitches. Once you learn to recognize the chain-one spaces, the repeating pattern becomes easy to follow.
Is Moss Stitch the Same as Linen Stitch?
Usually, yes. In many US crochet patterns, moss stitch, linen stitch, and granite stitch describe the same general stitch structure. Foundation and edge methods can vary between patterns.
How Many Chains Do You Need for Moss Stitch?
It depends on the version of the pattern. The tutorial on this page begins with an odd number of chains, such as 21, and uses a chain-one turning method with separate edge stitches.
Does Moss Stitch Use More Yarn Than Single Crochet?
Yarn usage depends on stitch tension, hook size, fiber, and finished dimensions. The best way to estimate it accurately is to measure a swatch made with your planned materials.
Is Moss Stitch Suitable for Blankets?
Yes. Moss stitch creates a textured fabric that’s suitable for blankets in a range of sizes. It’s particularly attractive with simple stripes and coordinated colors.
Can I Make Fingerless Gloves With Moss Stitch?
Yes, provided you use a suitable construction and check the fit. Moss stitch isn’t always as stretchy as ribbing, so gauge, yarn choice, and thumb placement are important.
Why Does My Moss Stitch Keep Getting Wider?
An accidental increase is the likely cause. You may have added an extra chain-one space or worked an additional stitch at the edge. Compare your current row with the expected stitch count. —
Yarn weights and hook sizes in this guide follow the Craft Yarn Council standards.
Keep going: Crochet Moss Stitch: Easy Free Tutorial for Beginners · Crochet Fingerless Gloves: Easy Free Pattern for Beginners · How to Crochet the Moss Stitch
Final Thoughts: Your Next Moss Stitch Project
Crochet moss stitch proves that beautiful texture doesn’t have to be complicated. With a foundation chain, single crochet stitches, and a repeating sequence of chain-one spaces, you can create fabric that works for everything from small handmade gifts to cozy seasonal accessories. Start with the 21-chain practice sample and focus on recognizing each chain-one space.
Once your rows look consistent and your edges stay straight, try a small striped project. From there, you’ll be ready to explore scarves, blankets, decorative pieces, and even fingerless gloves using patterns designed for those projects.
Save this crochet moss stitch tutorial to Pinterest so you can return to the pattern, stitch chart, and troubleshooting tips whenever you need them.
Written for The Crochet Side.
Pin “Crochet Moss Stitch: Easy Step-by-Step Tutorial for Beginners” so you can find it when the yarn arrives.
Get the next free pattern first
One email a week. New patterns, no noise.





